
De-Farbing the Denix
If you own a Denix or are looking to buy one and have seen the obvious flaws, don't fret, these can be improved very easily and cheaply. Putting an original M1 rifle or M1 carbine next to a Denix really shows how well they did this reproduction. Everything is in the right place, almost down to the mm; yes, there are a couple of screws that were poorly placed, but overall, it really is a great clone. Here are a few ideas for you to consider if you want to upgrade your Denix!
Ideas For Your Denix M1 Garand
The most obvious update for a Denix M1 is the stock - the wood is fairly easy to darken and re-colour, the screws can be hidden behind some filler and paint, the stock can be replaced with an original with some minor hollowing out, or the Denix stock can be drilled out, giving you the cleaning tool slots and allowing the butt plate to be replaced with an original. The original butt plates are a perfect match, even the screw holes line up perfectly! Sometimes Denix surprises me with things like that.

The woodwork supplied is a very bright, almost red colour. There are a dozen ways to change the colour (of course, wood stain is the obvious choice). However, oils and even dark brown boot polish can be used. I have tried boot polish myself and a few light layers do work fairly well.
The photo above shows the Denix buttstock with a light coat of brown boot polish, in the middle is a Denix M1 in an original M1 Garand Buttstock. The other two pieces of woodwork (the Rear Handguard - the wood part above the Operating Rod; and the Front Handguard - the wood part in front of the Front Sling Swivel) are Denix pieces that are in the process of slowly being darkened. On the bottom is my original M1 Garand that has some really light patches in the woodwork.
If you replace the stock for an original and keep the Denix Rear Handguard and the Front Handguard, you'll soon notice the vast differences in colour between them. Sometimes there are already slightly different shades in colour between the three parts of Denix woodwork. A close examination of original wartime Garand wood will also show the same variations in shades of colours. To a GI this really wouldn't have mattered one bit, after all the colour of the parts doesn't affect the functionality of the weapon. However, I would still make some effort to darken the Denix parts some extent to get rid of that reddish glare they tend to have.

To prepare the wood, take some 500 grit sandpaper and give it a light rub down.
Rub black shoe polish into the wooden parts and let dry overnight.
Next, apply a Dark Oak or Walnut wood stain and let it dry. Apply a second coat of the wood stain and, again, let the stain dry. You can either add a third coat or leave as is, depending on if you're happy with the colour or want it a bit darker.
For the metalwork, rub a soft wire wool pad gently over the metal parts. Focus on areas that would see a lot of use: the trigger and trigger guard, the operating rod and op rod handle, the windage and elevation knobs on the rear sight, etc. Just don't over-do it - in this case, less is more!
If you want to drill the Denix stock and replace the Buttplate, you'll have to first get hold of an original Buttplate (both wartime and post-war are the same size). Sadly, there are almost none in the UK, so it is almost pointless even looking for them. You usually find it much better value to buy a bulk lot of them, at least that is what I do for the ones I replace. Also, watch out for that dreaded import tax!
Below left shows the original WW2 M1 butt plate with its opening door; on the right shows the Denix one-piece cast item where the door is fixed in place.

To drill the holes, open the Buttplate door and secure the replacement Buttplate in place. Mark the centers of the top and bottom holes. Get a 20mm wide drill bit that is really long (auger is best) and drill out the hole for the oiler and tool. The top hole should be approximately 20cm deep and the bottom hole should be approximately 17cm deep. Make sure to keep the drill really straight! Once done, you'll need to open up a gap between the two holes, not deep, only about 5-8mm deep, as a recess for the door hinge. Once that is done, it looks best to stain the wood that has been newly cut and drilled... BEFORE you put the butt plate in place. Simple! Or I can do it for you...

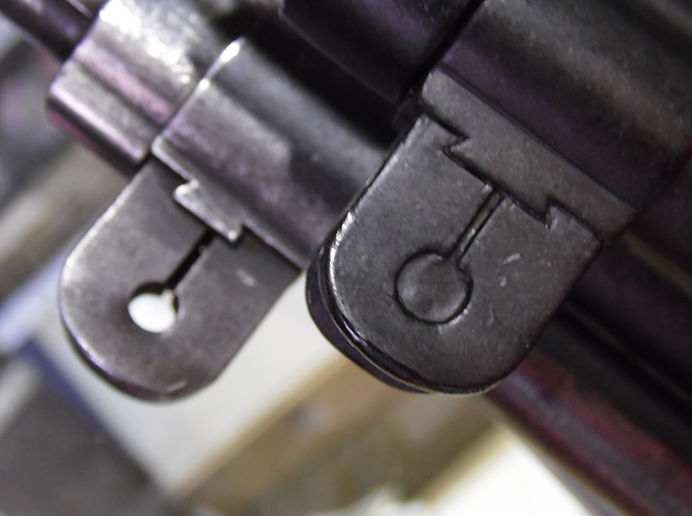
The front sight also isn't drilled through, it has an odd solid look to it, which can be sorted fairly easily with a good sharp drill bit. I haven't done this Denix Garand yet, but it's on the to-do list. The one in the background is an original with the hole in the sight ear and a slot below the hole. The foreground shows the solid sight on the Denix.
Use a 5mm drill bit (suitable for metal), and carefully drilled out the holes. Be careful not to go too deep!
Once you have drilled the holes, a quick spray our matt black paint on the sights will cover the shiny bits. DO NOT do too much, just a light spray. If you're a real fanatic, you could use a small Exacto blade to open up the slot below the hole.
Yoshihiko Sakashita from Steve's Militaria Restoration and Reproduction has come up with some great upgrades for the Denix:
To change the four-slot Gas Plug to the correct two-slot Gas Plug, he used a flat washer whose outside diameter and hole diameter match the existing Gas Plug, then used a round bar file to shape the two slots. Once filing is complete, he attached the washer to the front of the existing Gas Plug using some epoxy for metal and touched up with mat black spray paint.

To address the weakness and wobbling at the Front Handguard, he's solved the problem by inserting a homemade reinforcing spacer into the weak joint. Unfortunately, I don't have the exact dimensions, so you'll have to work that out on your own! The one shown was made from a 1.6mm iron plate without any drawings and was hand-fitted. For ease of machining, an aluminum plate would probably be fine.

WW2 Gear Shop also offers a U.S. WW2 M1 Garand-style Lockbar add-on made specially for the Denix for about €12.00.
https://ww2gear.shop/US-WW2-M1-Garand-Lockbar-for-Denix-Replicas-Cold-Cast-Metal-p487509538

Ideas For Your Denix M1/M1A1 Carbine
As with the M1 Garand, the M1 or M1A1 stock is a good place to start - the wood is fairly easy to darken and re-colour, the screws can be hidden behind some filler and paint, or the stock can be replaced with an original.


Other upgrades that can be made to your Denix M1 Carbine are listed below:
1) Replaced the barrel with correct sized mild steel.
2) Add an original front sight.
3) Add a correct two-rivet upper handguard and make the necessary cut-out for upper handguard to slide into.
5) Add a correct Type 1 barrel band. Get a reproduction - originals are very rare and very expensive!
6) Switched to the correct flat bolt.
7) Fill the operating rod handle screw hole.
8) Switch to the correct flip-type rear sight. Get a reproduction - originals are very rare and very expensive!
9) Add wood to the slide side of the stock to look like a high-cut stock.
10) Modify the safety to look like the early hatched safety.
11) Modify the stock into a correct early version by widening and cutting the proper “I” shape oiler slot.
12) Add the correct manufacturer stampings if you have the correct stamps and skills to pull it off.


Potential upgrades that can be made to your Denix M1A1 Carbine are listed below:
Mods 1-9 (above) for the Denix M1 Carbine upgrade, plus the following:
1) Modify the folding stock by reinforcing the joints and improving the locking pin.
2) Modify the safety to the early push type.
3) Add operating rod slot drill cuts.
4) Modify the oiler holder to fit an original oiler.
5) Add Inland stamping if you have the correct stamps and skills to pull it off.


